
How to Integrate adsfox with TikTok (TikTok Ads)?

That’s a massive edge for lead-driven businesses and performance agencies aiming to fine-tune campaigns around actual buyers, not just anyone who fills out a form.
The setup boils down to:
- Connecting your TikTok Ads account to adsfox,
- Entering your Pixel ID and Event Access Token,
- Picking the right conversion events (both standard and custom),
- Turning on server-side event sending for new leads, qualified leads, non-qualified leads, and sales.
Step 1. Connect Your TikTok Ads Account to adsfox
Start by tying your adsfox user account to a TikTok profile with access to TikTok Ads.
- Log into your adsfox account.
- Head to the TikTok tab on the main dashboard.
- Click the “Continue with TikTok” button:
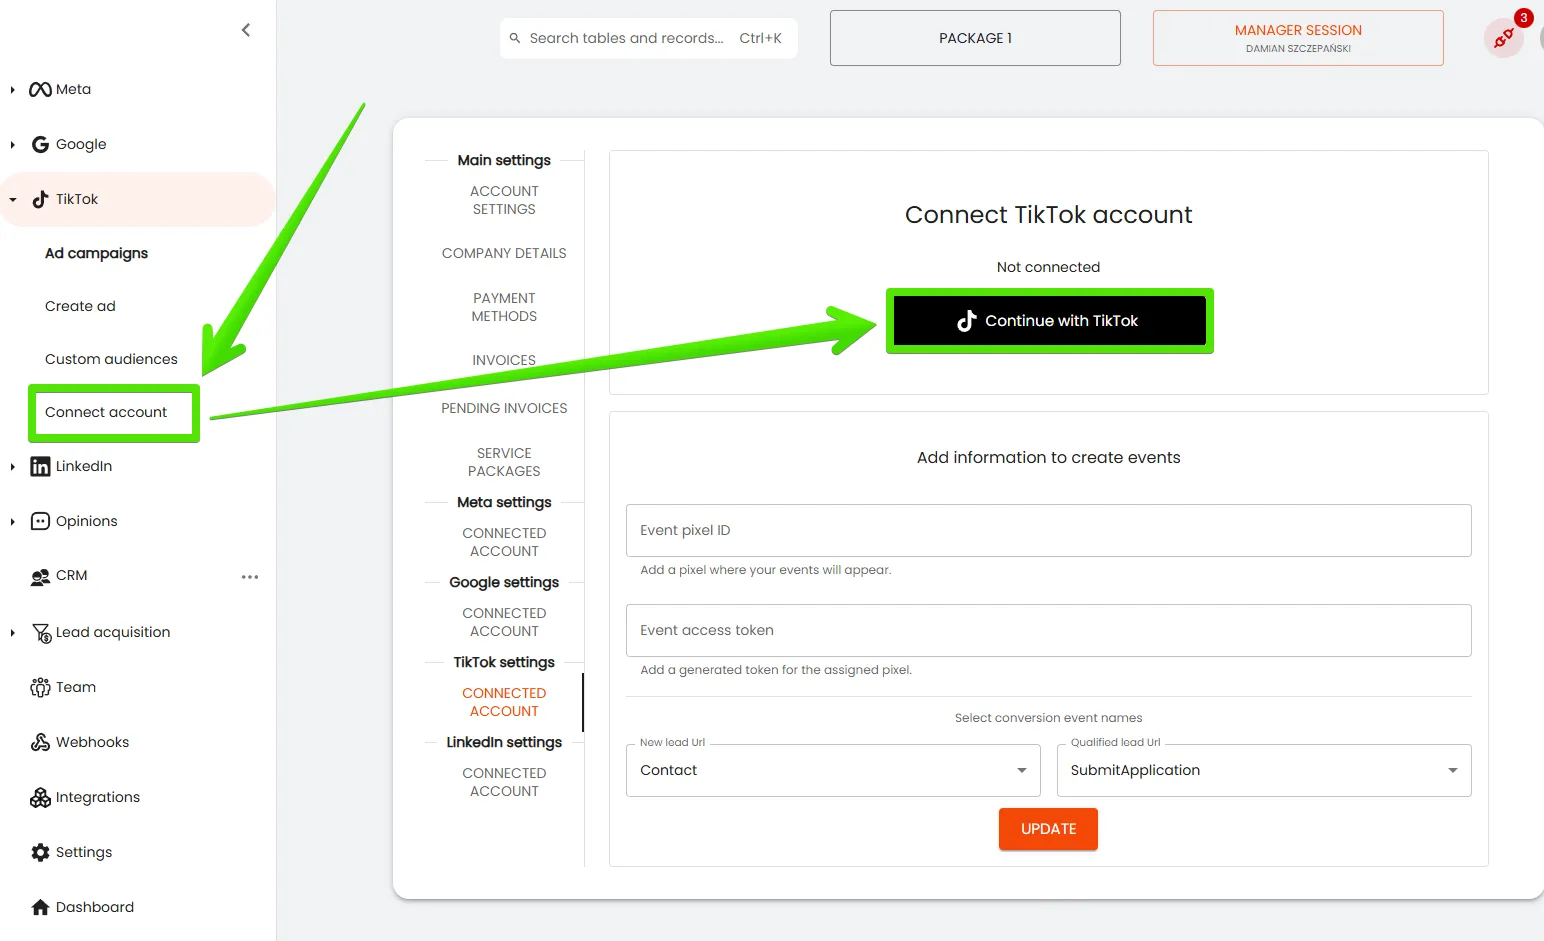
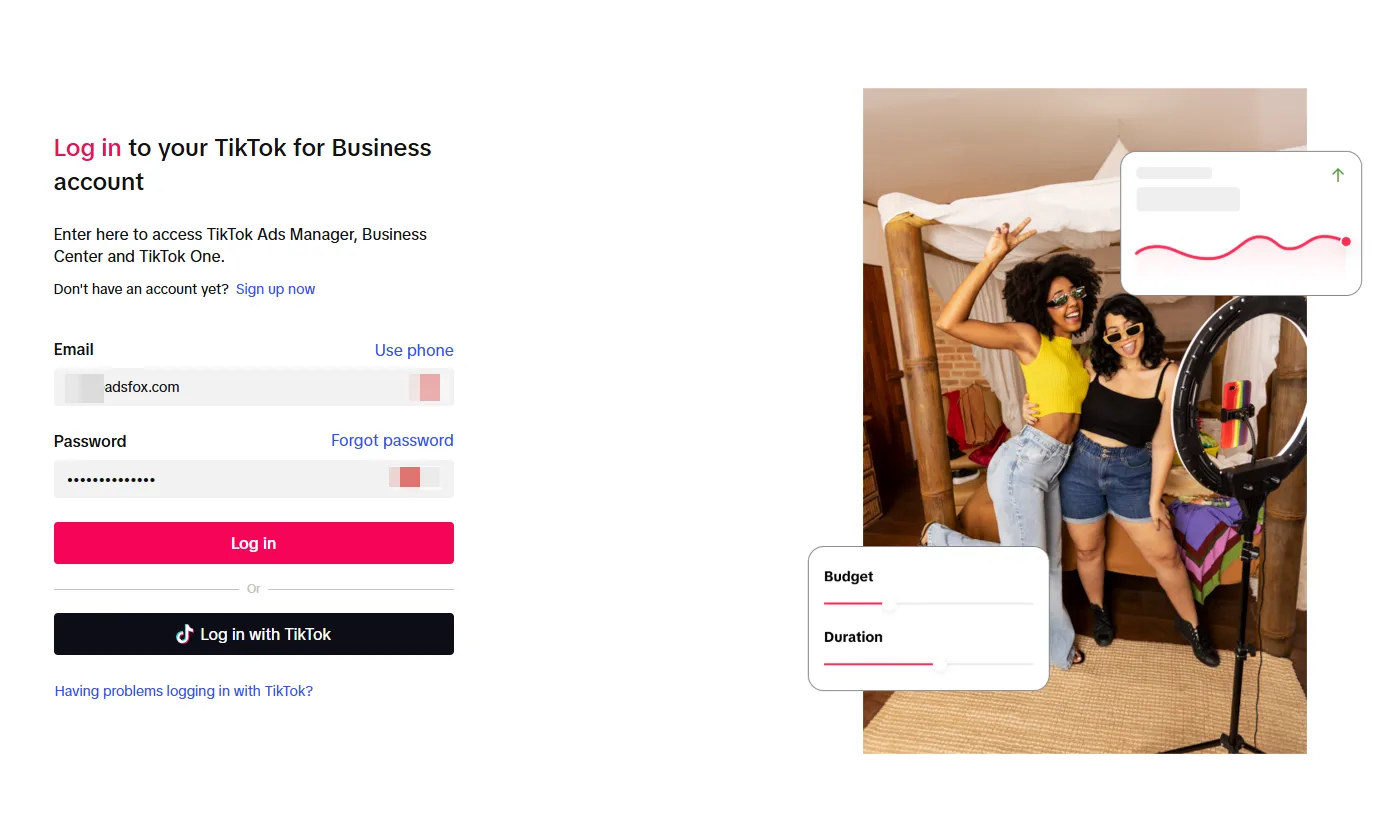
4. You’ll be redirected to TikTok’s login page (or account selector if you’re already signed in).
5. Sign in with the TikTok account that has access to the right ad account (TikTok Ads Manager).
6. Approve the permissions adsfox requests so it can pull data from your ad account and send conversion events.
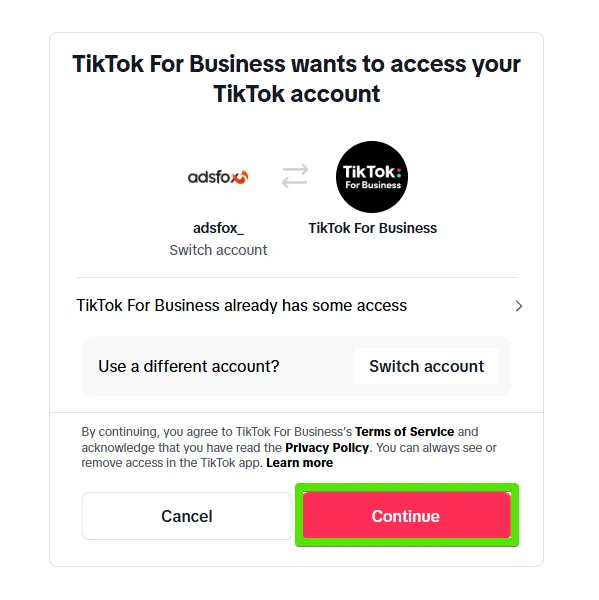
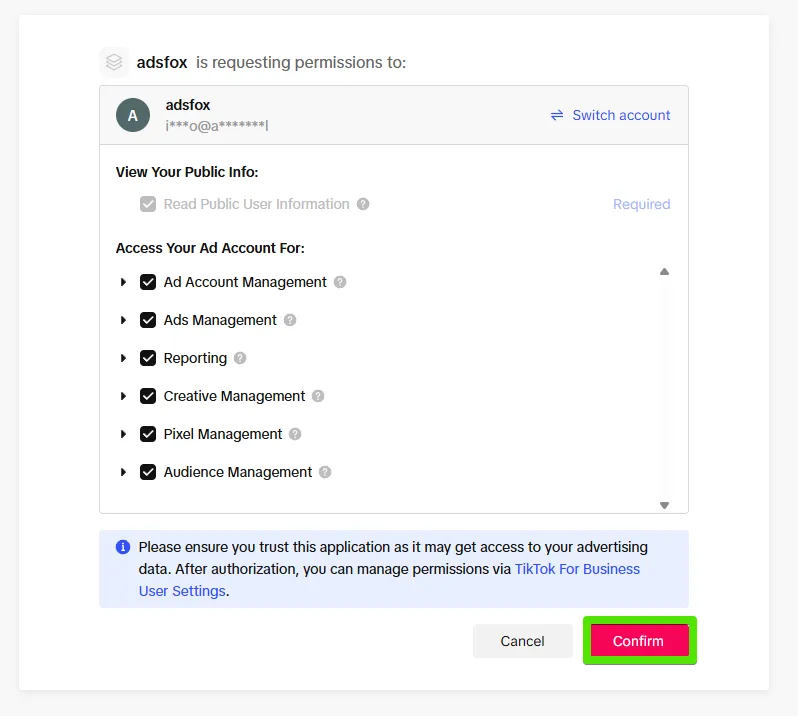
Once logged in and authorized, you’ll bounce back to the adsfox dashboard automatically.
Step 2. Select Your Ad Account, Page, and TikTok Pixel
Now in adsfox, you’ll see options to pick resources tied to your TikTok account.
- In the TikTok tab, choose the ad account from the dropdown that you’ll use in this adsfox workspace.
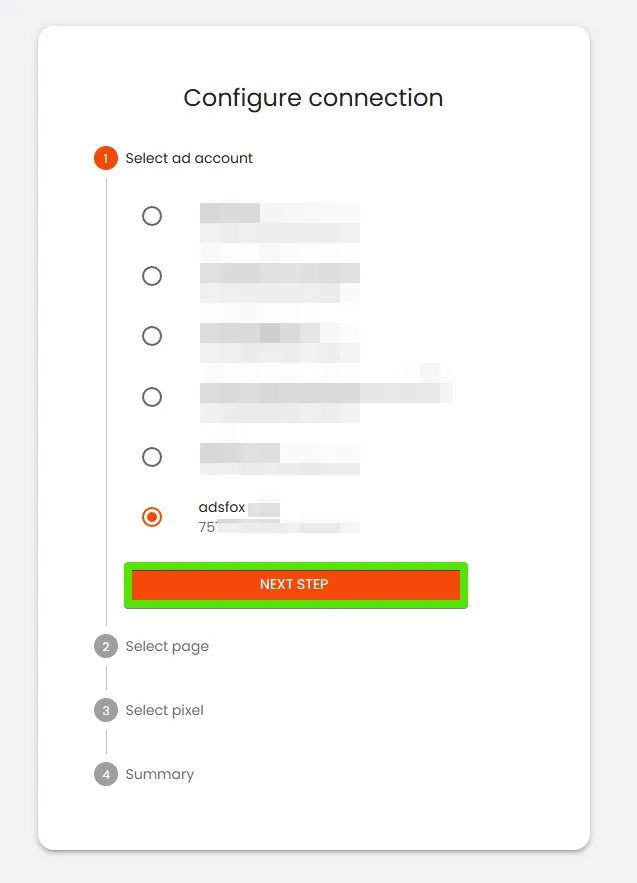
2. Pick the linked page or TikTok profile too.
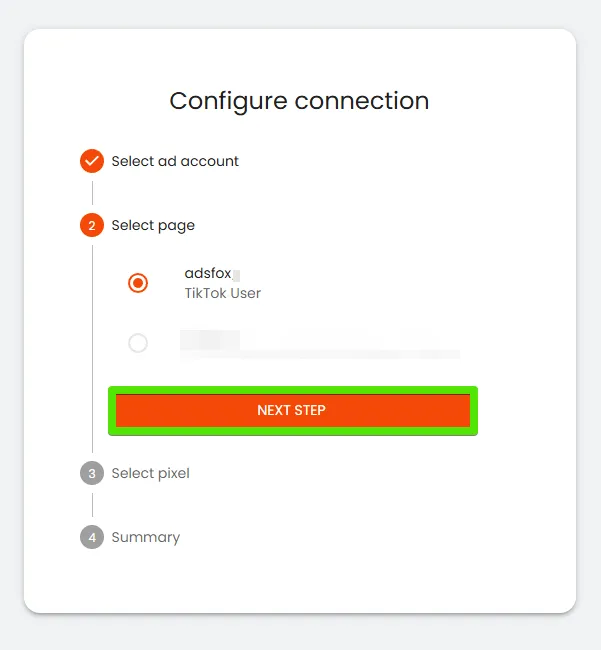
3. Select the TikTok pixel associated with your ad account—it’ll handle event tracking for your campaigns.
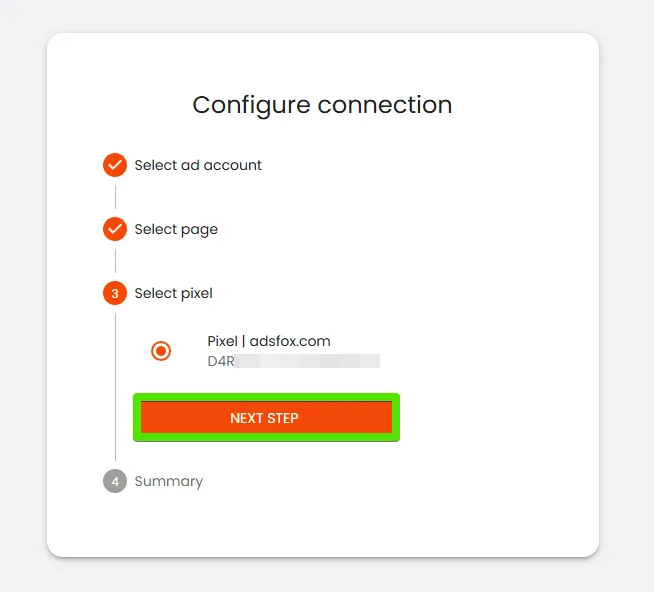
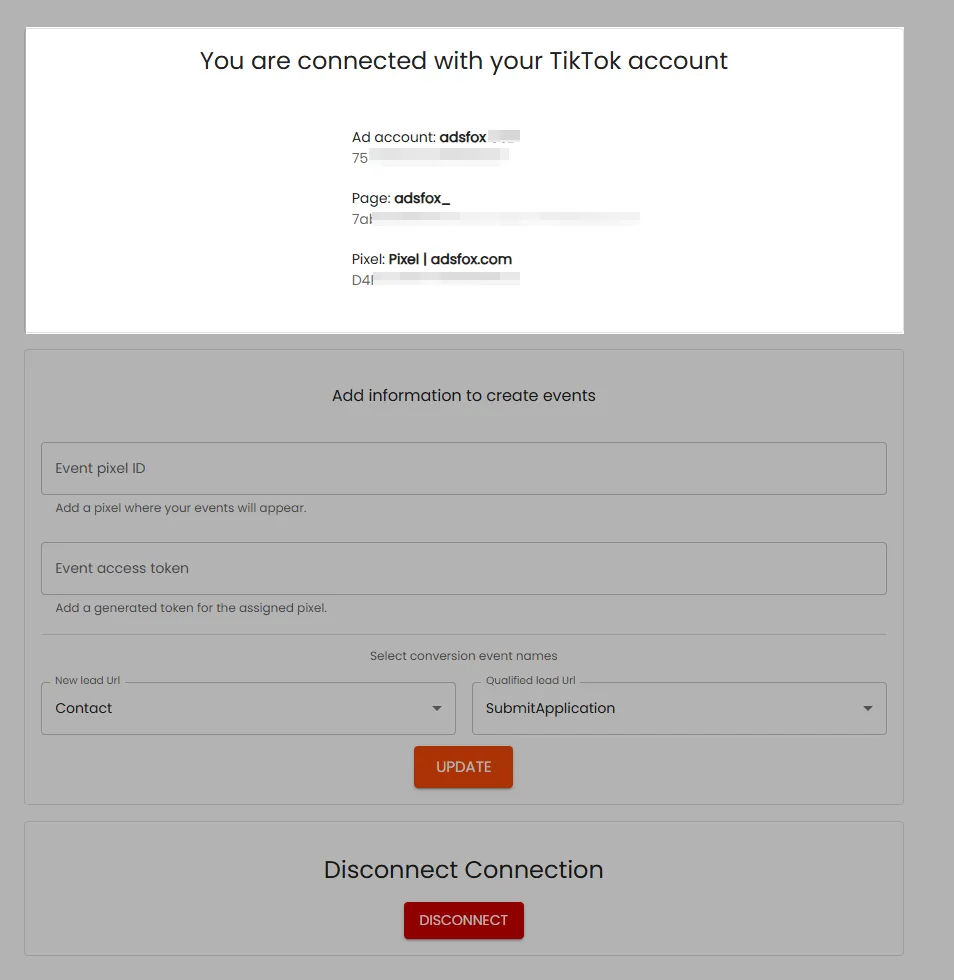
After nailing these selections, a confirmation screen will pop up, showing these resources are now assigned to your adsfox workspace.
Step 3. Grab Your Pixel ID and Event Access Token from TikTok Ads
Next, pull the technical details for your pixel from TikTok Ads to enable adsfox to send server-side events (TikTok Conversion API).
- Jump into TikTok Ads Manager.
- Open the Pixels / Events section.
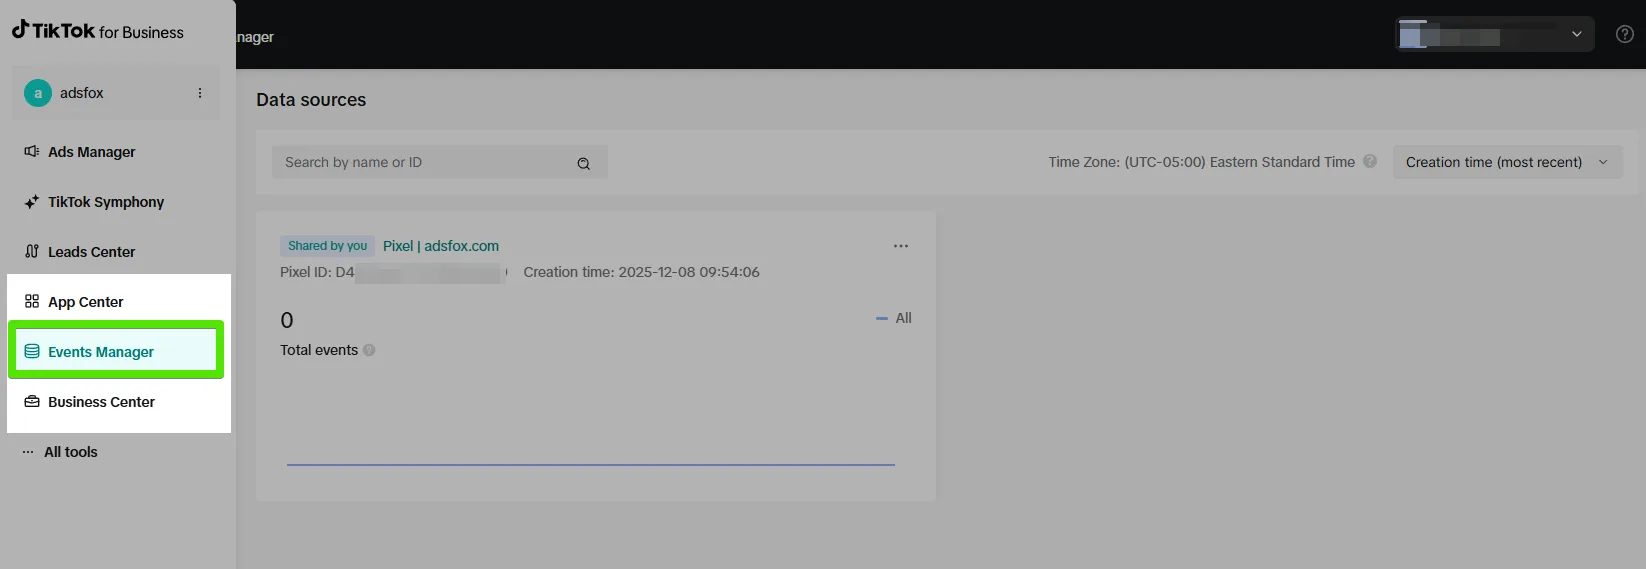
3. From the pixel list, pick the one you just connected to adsfox.
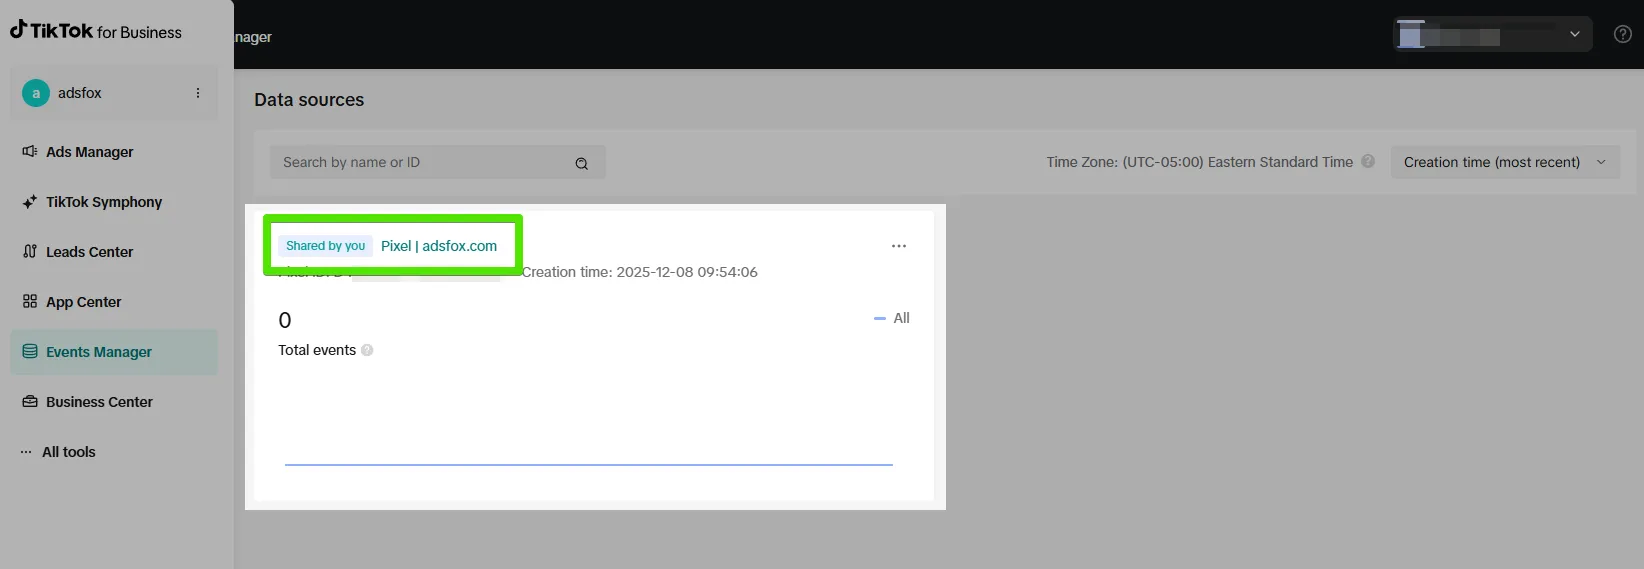
4. Dive into pixel settings (Pixel Settings / Events Manager):
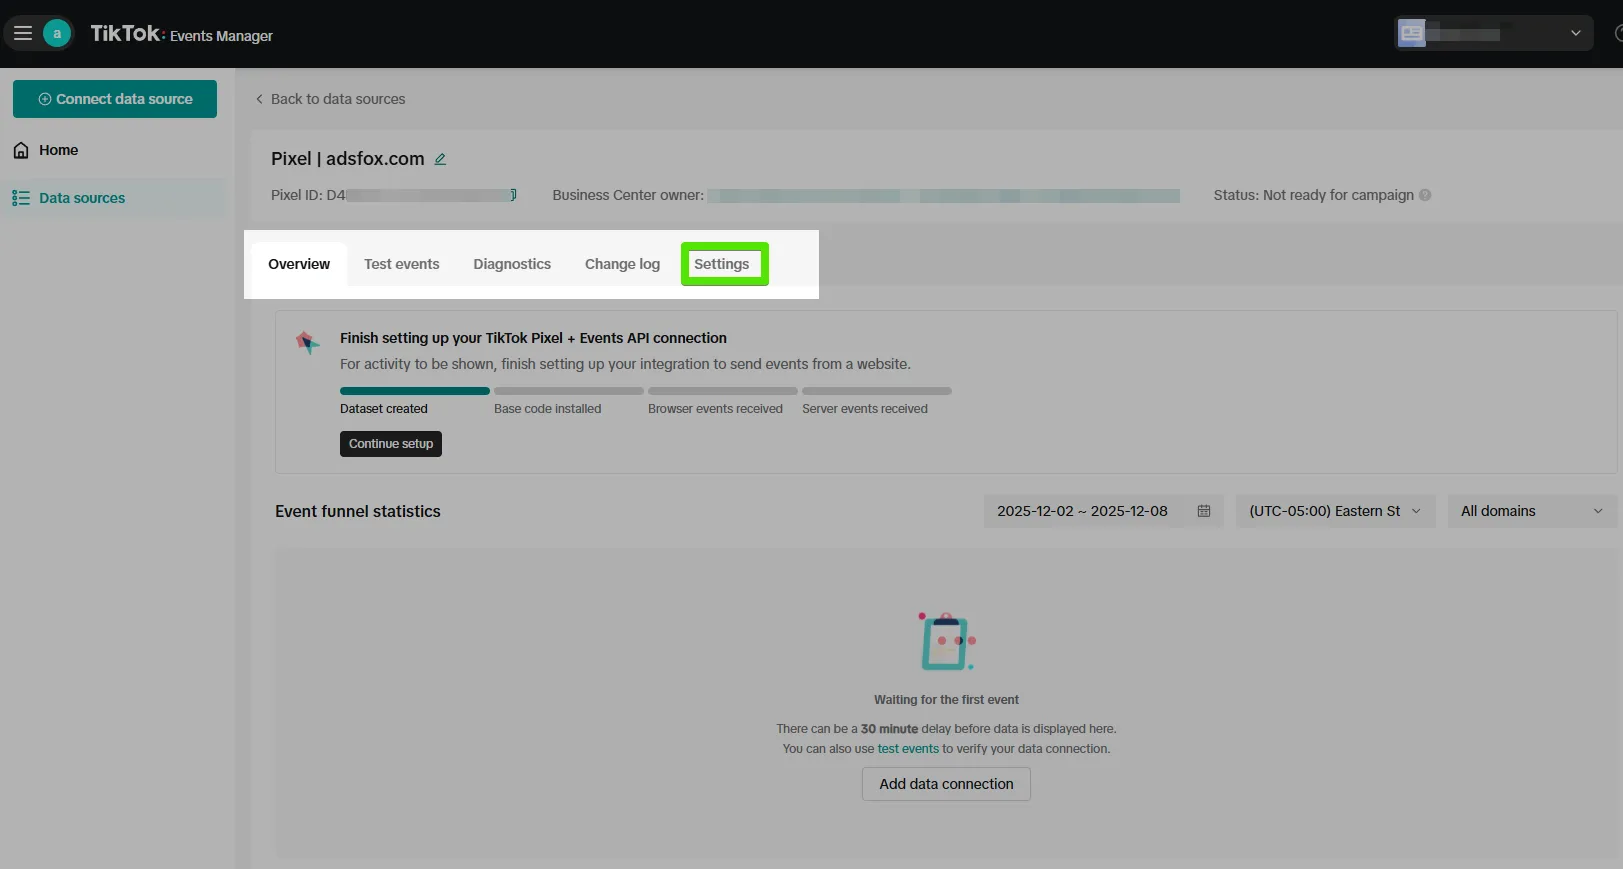
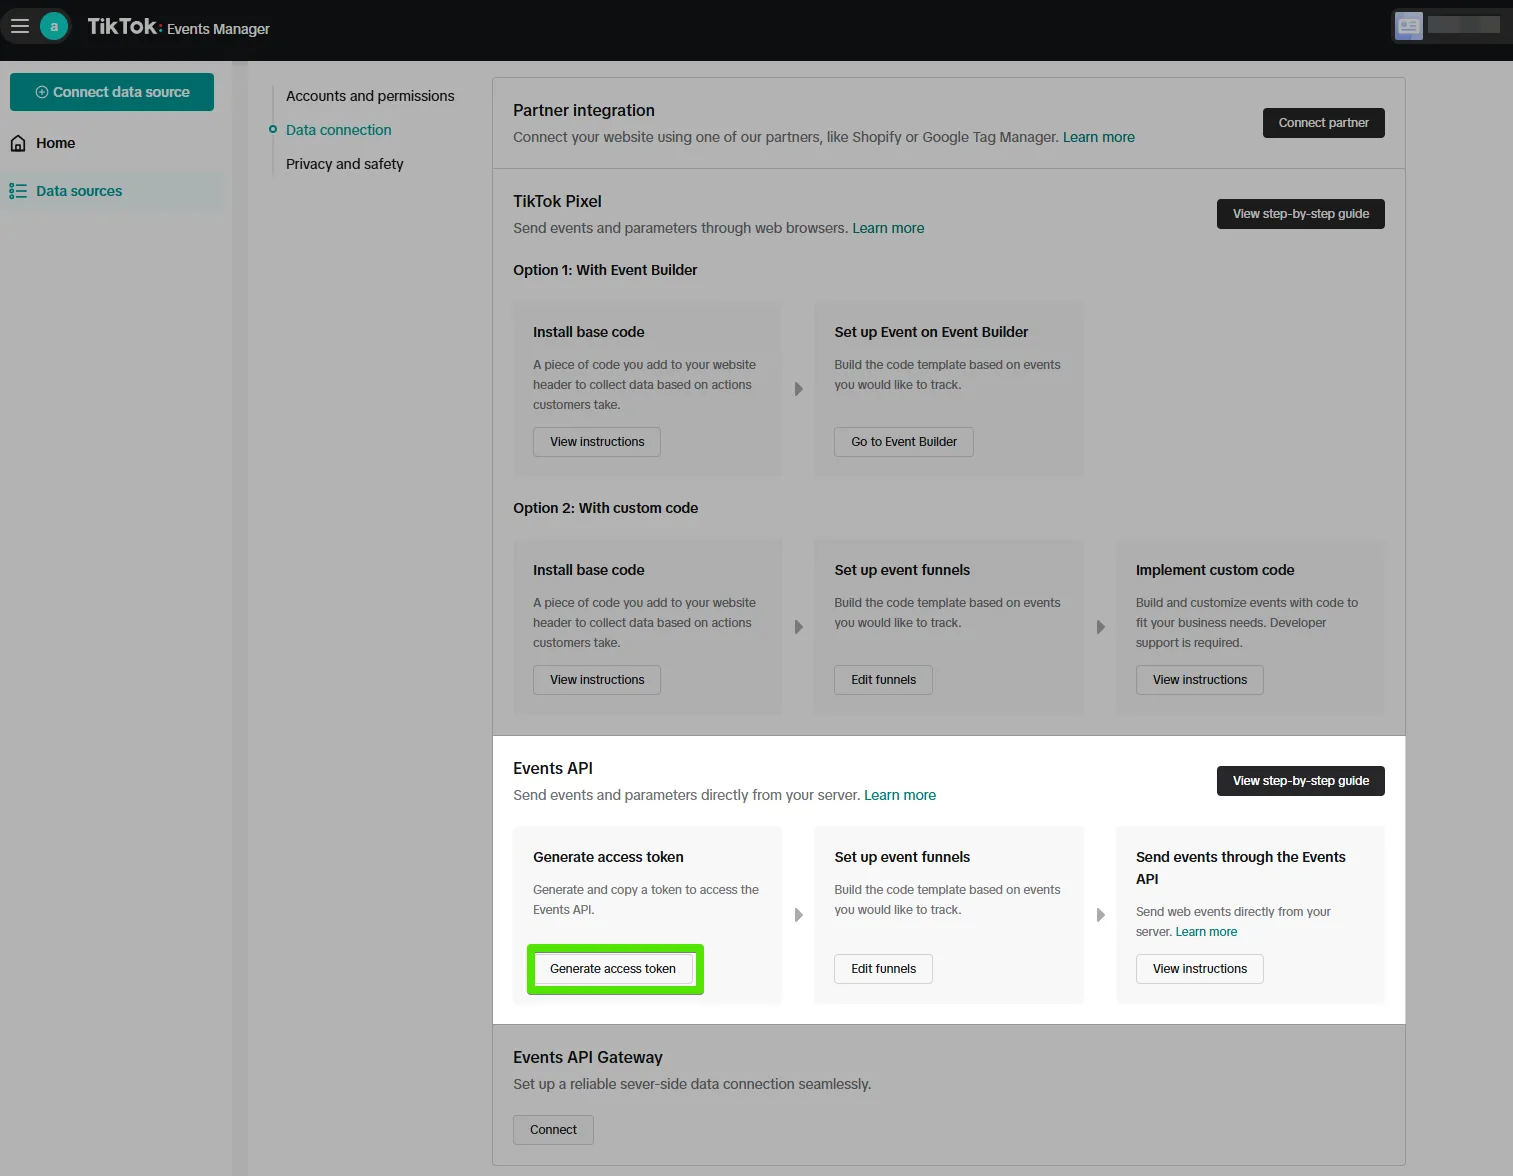
5. In settings, locate:
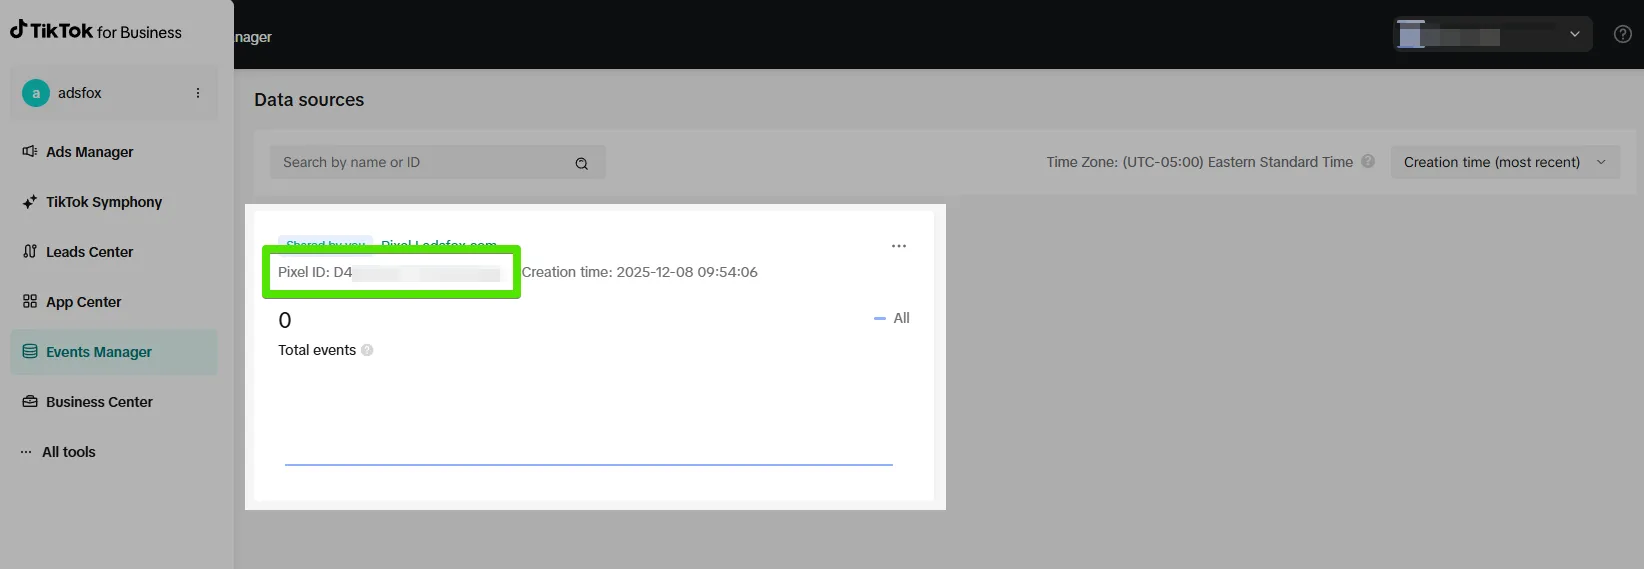
- Pixel ID—your pixel’s identifier,
- The option to generate an Event Access Token (for event access).
6. Create a new Event Access Token (if needed) and copy it somewhere secure.
Step 4. Enter Pixel ID and Event Access Token in adsfox
Time to plug those pixel tech details into adsfox.
- Back in adsfox, go to the TikTok tab under integration settings.
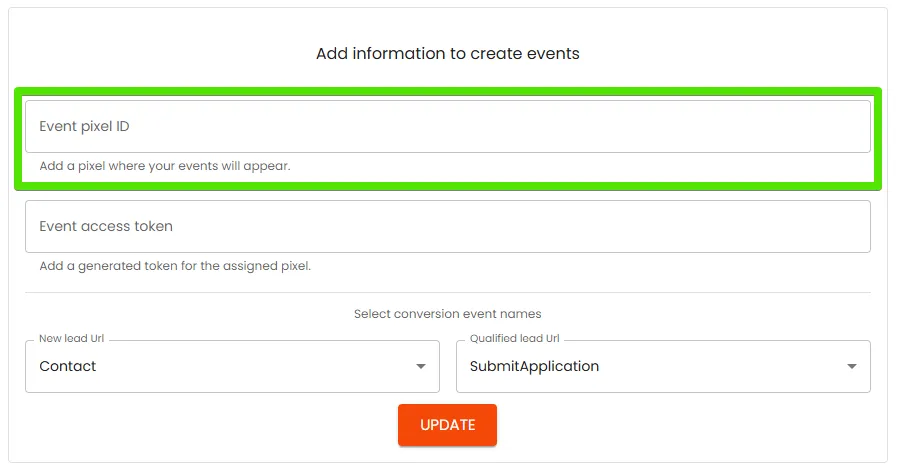
- Paste the TikTok pixel identifier from Events Manager into the Pixel ID field.
3. Drop the generated event access token into the Event Access Token field.
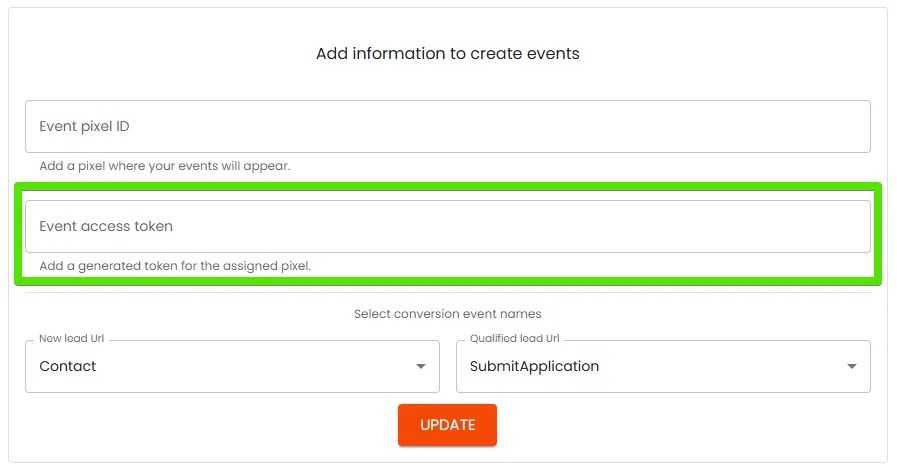
4. Hit “Update / Save” to lock in the settings.
With that saved, adsfox is ready to fire off server-side events to TikTok via TikTok Conversion API (server-side tracking).
Step 5. Choose Events to Send to TikTok
The final tweak in adsfox is specifying which event types to push from your system (or CRM) to TikTok.
- In adsfox’s TikTok tab, navigate to Event Mapping / Conversion Events.
- Decide which lead process events to send as conversions to TikTok.
- Our standard recommendation:
- New lead → standard event Contact
- Qualified lead → standard event SubmitApplication
- Save your event mapping settings.
In the next section, we’ll break down how standard and custom events work and how to leverage them for campaign optimization.
How TikTok API Conversion Events Work Standard and Custom
TikTok’s Conversion API supports two event types:
- Standard events,
- Custom events.
The key difference:
- Only standard events can directly fuel campaign optimization,
- Custom events are great for analysis, segmentation, and audience building.
Standard Events
In adsfox, we’ve mapped two core lead events to TikTok’s standard ones by default:
- New lead → standard event Contact
- Qualified lead → standard event SubmitApplication
This setup lets you:
- Optimize TikTok campaigns for new lead acquisition (Contact),
- Optimize for qualified leads (SubmitApplication), the ones that really count.
If these events are already in use in your system or Tag Manager, tweak the mapping to alternatives like:
- New lead → standard event Lead,
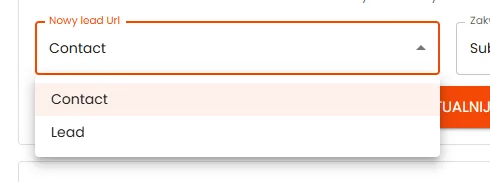
- Qualified lead → standard event CompleteRegistration or ApplicationApproval.
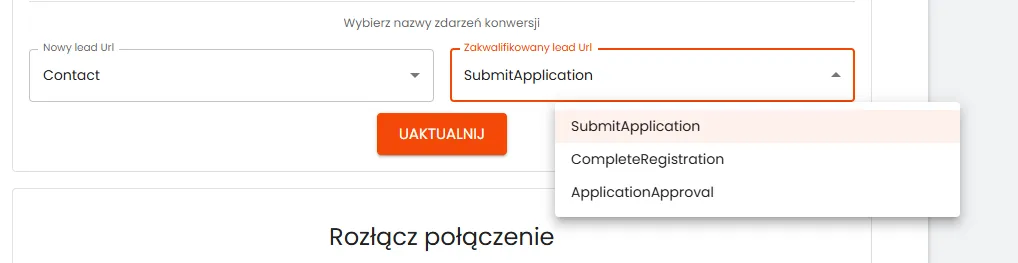
This keeps data clean and reports organized.
Custom Events
On top of standards, adsfox can send custom events to TikTok, like:
- Non-qualified lead – unqualified lead,
- Sales – sales.
You can’t optimize campaigns directly on them, but they’re powerhouse tools for:
- Analyzing traffic quality (what % of leads flop?),
- Crafting precise lookalike audiences from actual clients (Sales),
- Excluding dud groups (users like non-qualified leads).
Blending standard and custom events gives you a complete view of TikTok campaign performance across the sales funnel.
What Happens After Full adsfox + TikTok Integration?
Once fully connected:
- adsfox captures every lead from your site and campaigns (TikTok forms included),
- Leads get tagged in your CRM per your sales flow (new → qualified → non-qualified → sales → lost),
- Those tags zip back to TikTok as server-side events via TikTok Conversion API,
- TikTok algorithms learn from valuable leads, not random submissions,
- Build sharper lookalike audiences rooted in real customers,
- Weed out low-quality traffic with negative signals (non-qualified leads).
It’s a tight closed-loop system, aligning with top practices in lead qualification, server-side tracking, and Conversion API.
What’s Next?
adsfox + TikTok integration is a quick win to pivot from lead volume to real sales value, just like elite performance teams do.
Post-setup, focus on:
- Setting up a solid lead qualification process in your CRM,
- Ensuring consistent lead value tagging,
- Testing optimization strategies (new lead vs. qualified lead vs. sales).
In our next guide, learn how to craft powerhouse TikTok campaigns using adsfox lead value data and real-client lookalike audiences.