Integrating Pipedrive with adsfox (Webhook)

Under the hood, the webhook serves as a secure URL endpoint, allowing Pipedrive to send POST requests with JSON payloads from your mapped fields. Say goodbye to manual data transfers and hello to minimized delays in campaign tweaks. With this integration, you’ll enjoy real-time optimization based on actual sales signals, think qualifying leads as SQLs, high-value prospects, or revenue generators. It handles leads from anywhere: not just lead ads, but website forms, SEO traffic, or direct visits. Cross-train algorithms across platforms (e.g., Facebook insights sharpening TikTok or Google targeting), get end-to-end customer journey tracking in GA4 from click to closed deal, and even fall back to CSV for custom CRMs.
No extra tools like Stape, Zapier, or Make required, just a quick 5-minute CAPI snippet setup ties your existing CRM to ad accounts and your site, cutting tech friction to a minimum. It’s a game-changer for systems churning out 200+ leads monthly, empowering algorithms to learn from at least 5 daily signals, though you’ll see tagging benefits from day one. This step-by-step guide covers webhook setup, Pipedrive automations, and adsfox field mapping for a rock-solid connection that auto-classifies leads for peak ROI.
Step 1. Configuration in the adsfox Platform
- Log in to adsfox at https://use.datadriventool.com/, ensuring it’s linked to your ad accounts.
- Navigate to the “Connect your CRM” tab.
- From the dropdown list, select “Pipedrive”.

4. In the table below, you’ll see your dedicated webhook along with the access token.
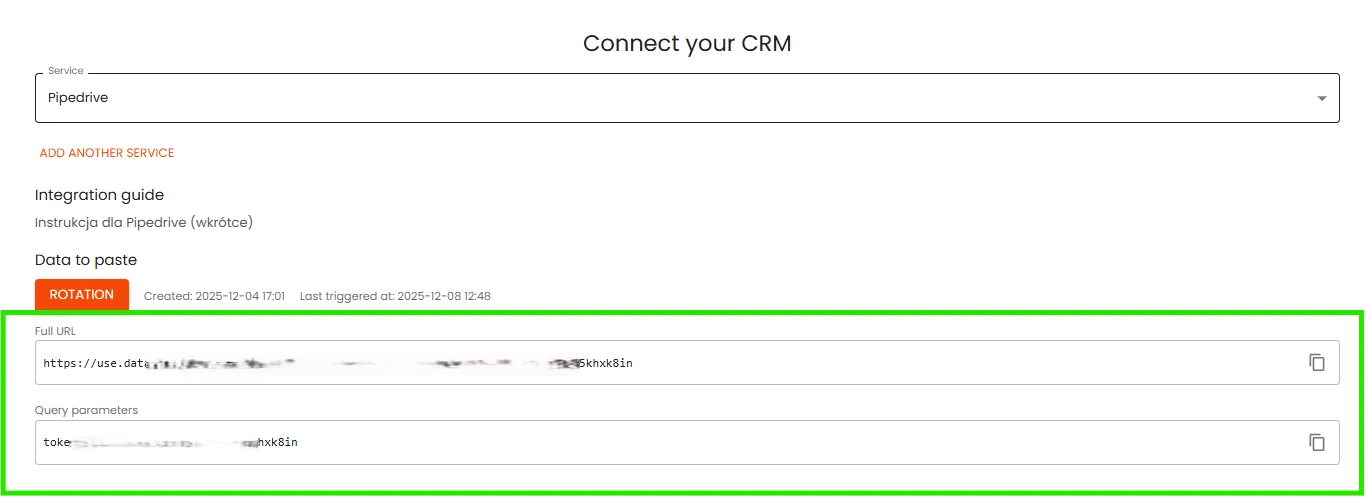
Clicking the “Rotation” button will generate new webhook data, invalidating the previous one.
5. Copy the webhook and token, then log in to your Pipedrive account and proceed to the next section.
Step 2. Configuration in Pipedrive
- Log in to your admin account in Pipedrive.
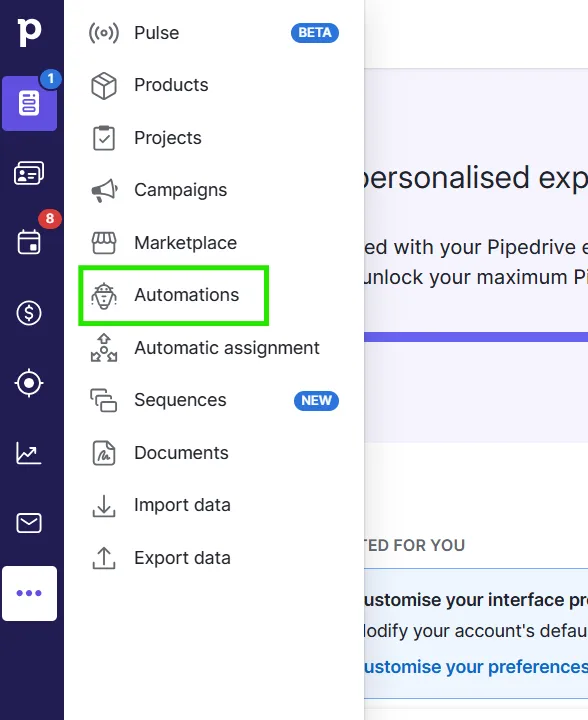
- Click the “more” icon, then select “automations”.
3. Go to the “Elements webhook” tab.
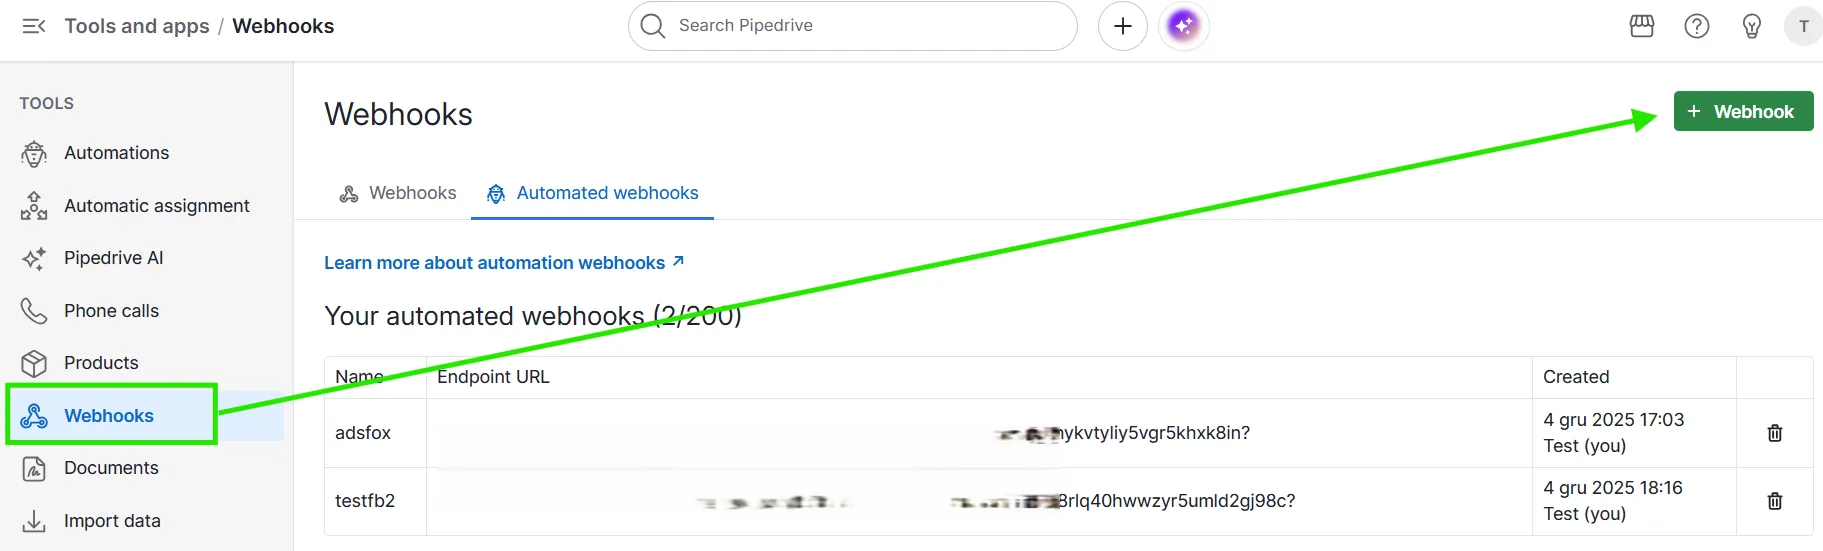
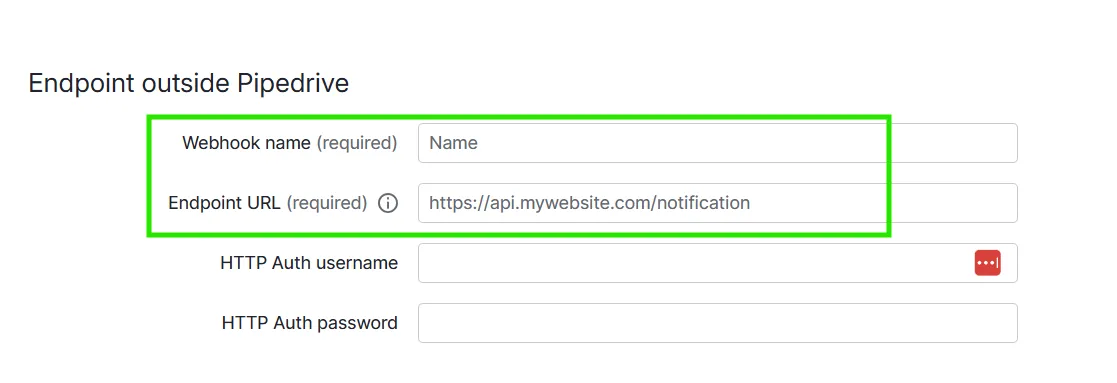
4. Next, you’ll see the window shown in the example below.
Webhook element name – Enter a name of your choice (like “adsfox” as in the example).
Target URL – Paste the copied webhook from adsfox and add “?” at the end.
7. After completing the above, save the data in the upper right corner and move to the next step.
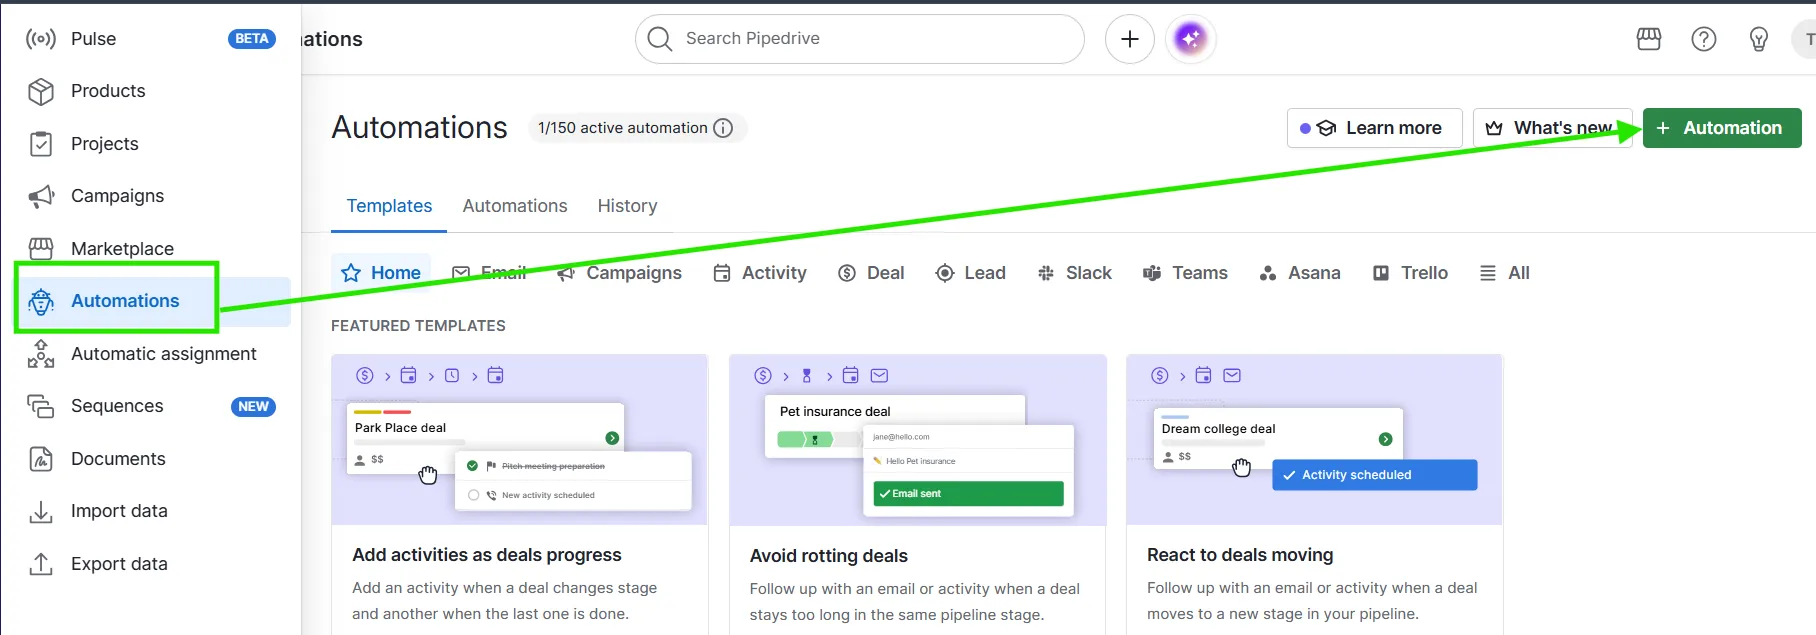
8. The next step is to go to the “Automations” tab.
9. Click the green “+ Automation” button (see the screenshot below).
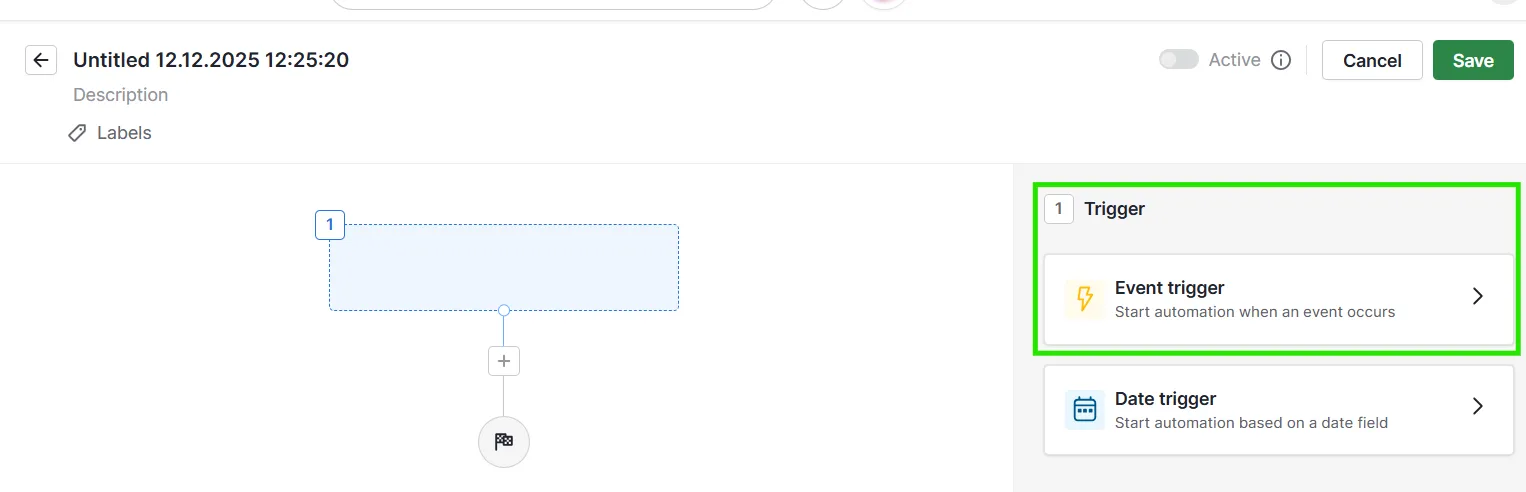
10. Click “trigger event”. (screenshot below)
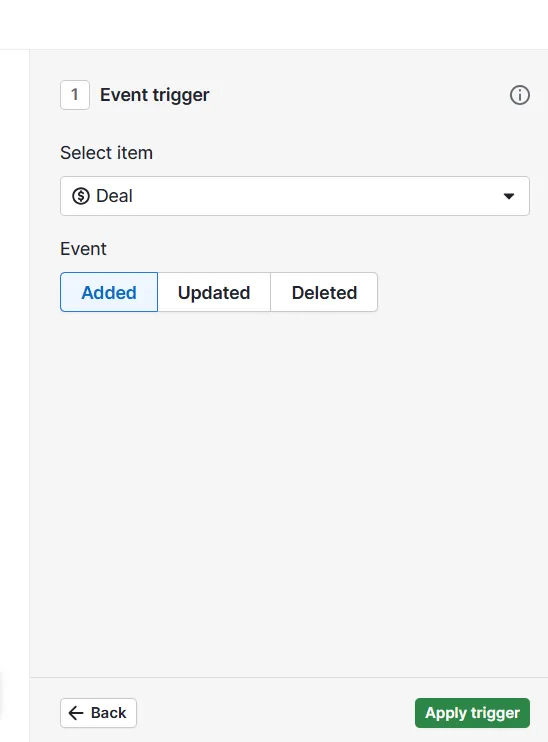
11. In the “Select element” tile, set “Sales opportunity”.
12. In the “Event” tile, check “Added“.
13. Finally, select “Apply trigger“.
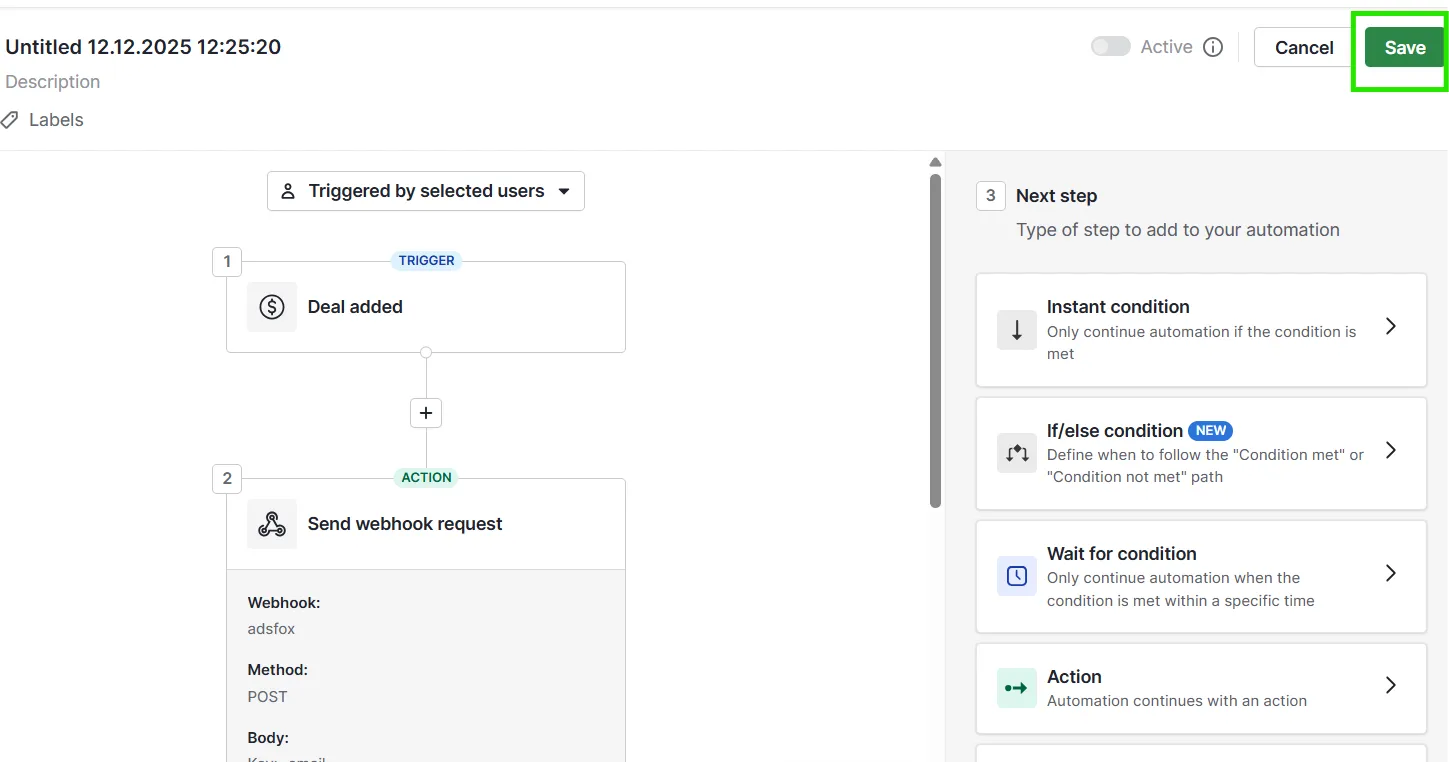
14. After saving, select the “Action” tab.
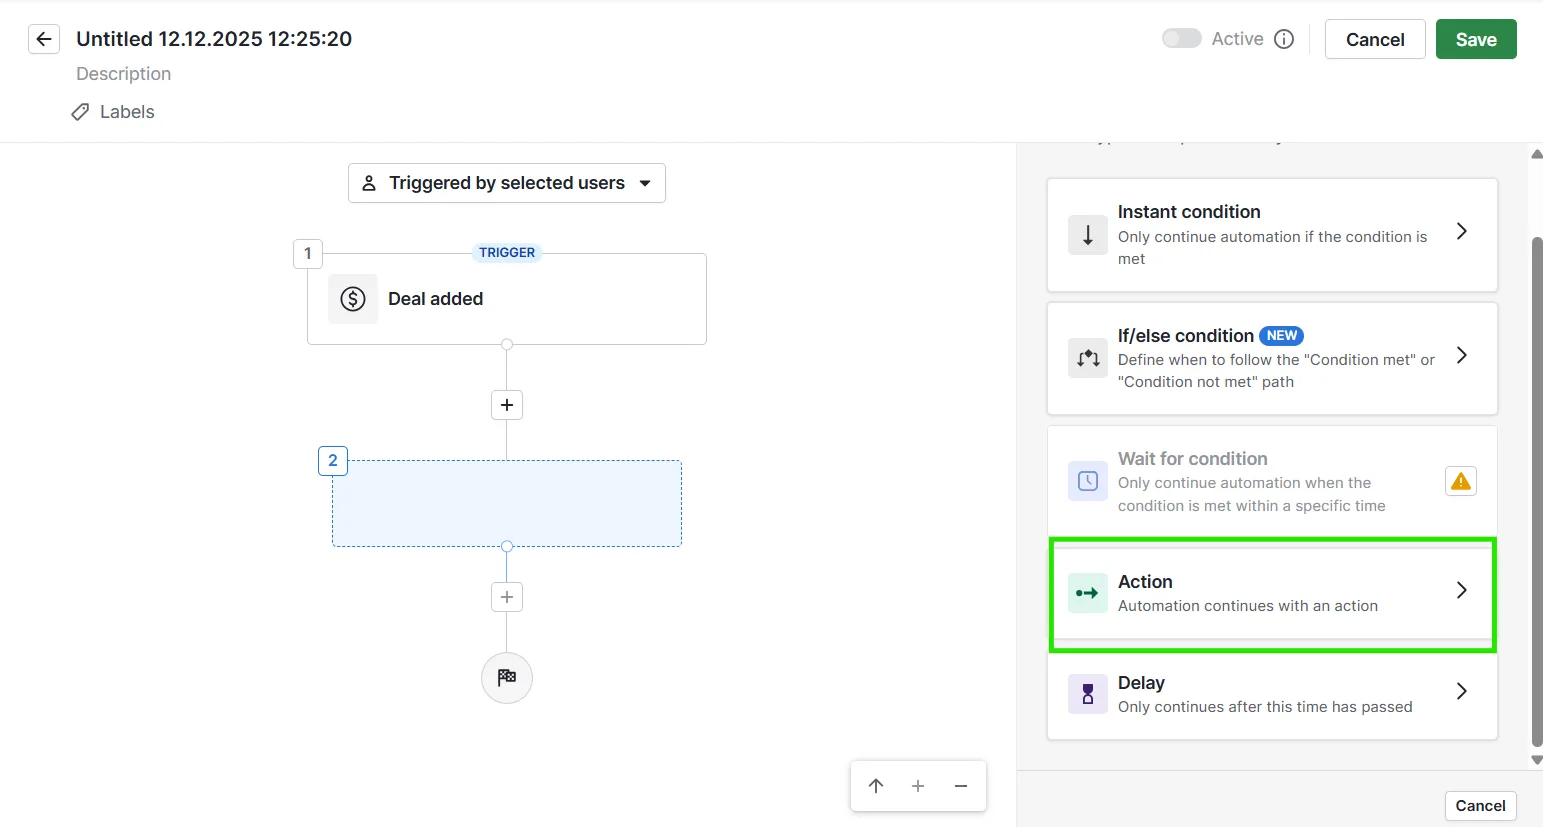
15. Then, from the list on the right, choose “Webhook” and click “next” (screenshot below)
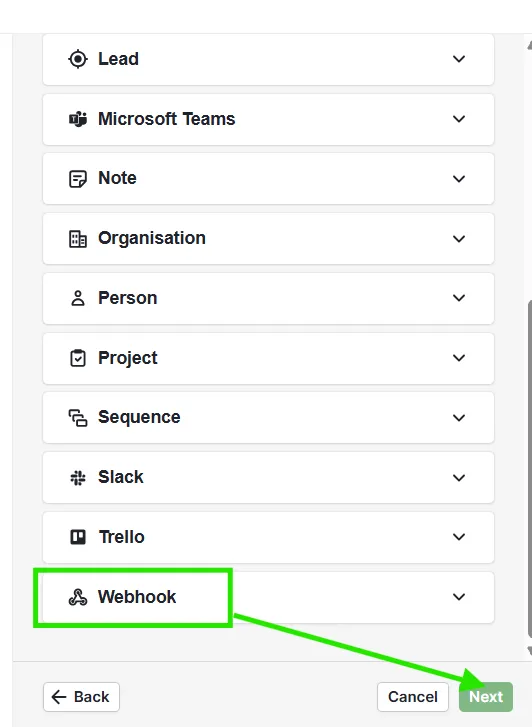
16. Start typing “adsfox” – this will be the one we created earlier.
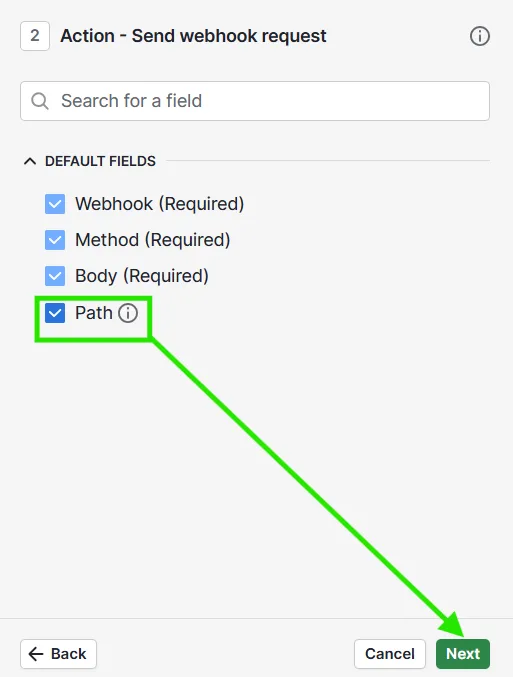
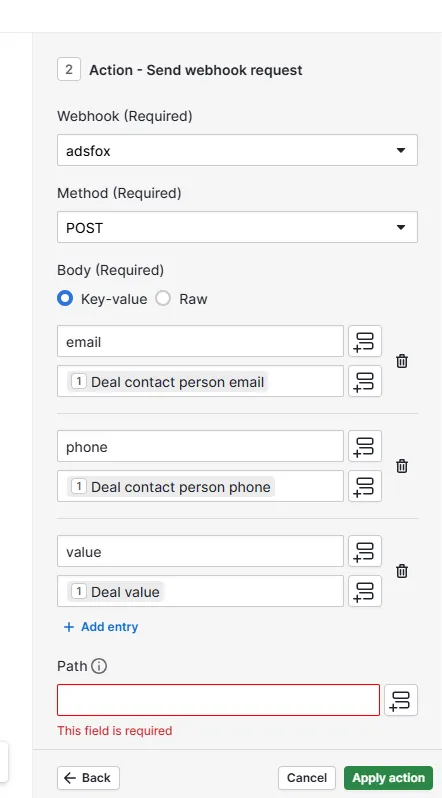
17. Webhook Element (Required) – Select the name you created earlier; in this guide, it’s “adsfox”.
18. Method (Required) – Choose POST
19. Content (Required) – Fill in according to the column names you’ll use in your system (the examples below refer to default active columns in Pipedrive)
(a) email – Contact person’s email address associated with the sales opportunity
(b) phone – Contact person’s phone associated with the sales opportunity
(c) value – Sales opportunity value
For accurate data transfer to your ad account, you only need one value: email or phone – value is mandatory. If a record lacks an email or phone (one of these values is enough), it doesn’t affect effectiveness as long as its value is properly marked.
20. Path – Paste the generated token from the start of the guide.
21. Click apply actions.
22. Save the configuration in the upper right corner.
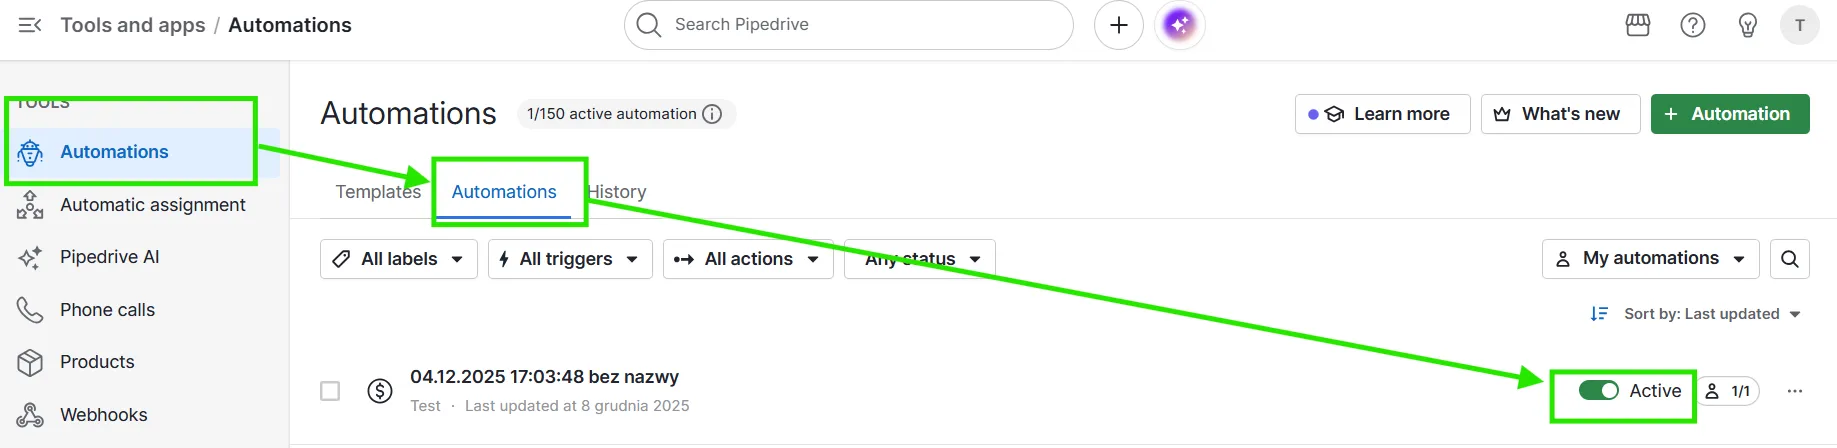
23. Go to the Automations tab and switch the automation to “Active” – as shown in the screenshot below (it’s inactive by default after creation).
Step 3.Webhook Field Mapping in adsfox
After setting up the automation in your Pipedrive system, run a test and map the appropriate fields in adsfox.
To do this:
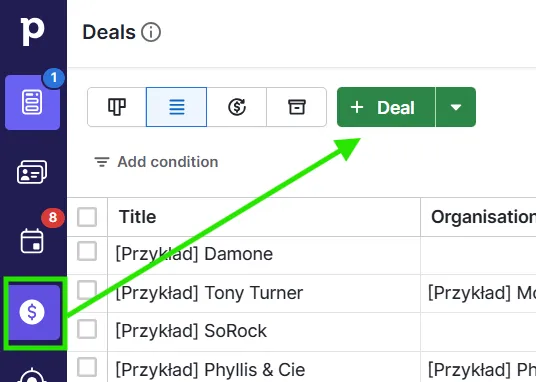
- Create a new sales opportunity in the system and fill in sample data
2. Head to adsfox in the “Connect your CRM” tab (where you copied the webhook data), then verify the latest payload to see if the data was sent:
3. Click “Raw JSON” (shown in the screenshot above).
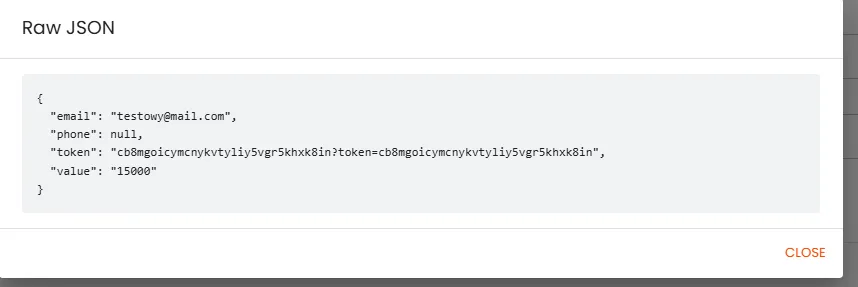
4. Now we know what data was sent to us by Pipedrive and how we can map it. For this, scroll down a bit to the “Key Data..” tab and select the orange icon next to the first column we want to map:
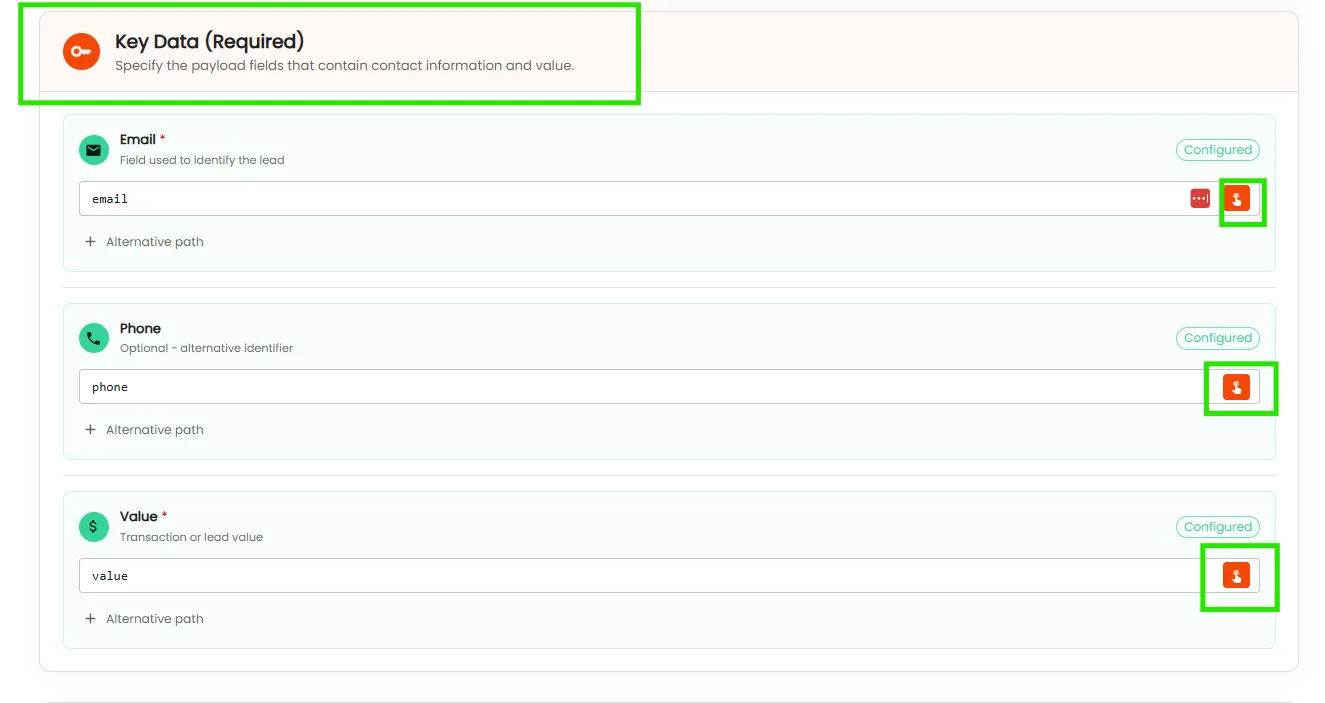
5. A search bar will appear where you can find the column where you entered the client’s email, then click on that field to map it in our system. Remember to save changes. Do this for all 3 data points.
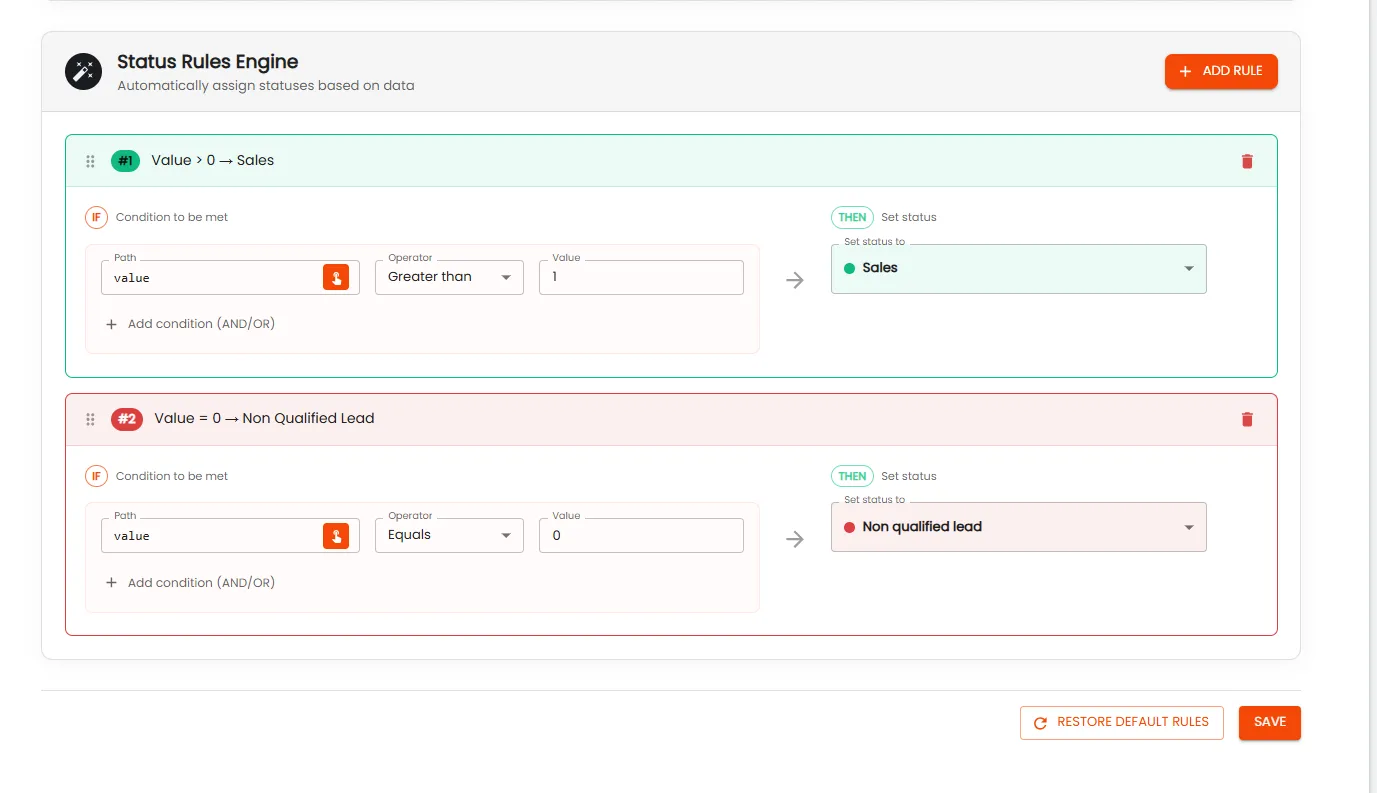
6. Next, scrolling down, you can set conditions for marking and classifying leads. Example below:
Congratulations!
You’ve done it! With every step complete, from webhook setup in adsfox to automations in Pipedrive, field mapping, and payload testing, your integration is up and running. Now, lead values (like emails, phones, and deal amounts) auto-flow to your ad platforms, shifting optimization from mere form fills to real sales signals, including qualifications and revenue.
For peak performance, aim for at least 200 leads per month so algorithms can train on 5+ daily signals, but you’ll spot gains right from your first tagged leads. Sharing access with agencies? Anonymize lead data for added security. adsfox stands out with its low-friction integrations, support for leads from any channel (beyond just lead ads), and comprehensive GA4 views, from click to contract close.
Got questions? Dive into our FAQ or reach out to support. Start optimizing for revenue today and watch your campaigns get smarter and more profitable!
What’s next?
Once the configuration described above is complete, the next step is to consistently and deliberately tag your leads, regardless of whether they come from Meta, Google, or other acquisition channels. The way leads are qualified and labeled directly impacts how advertising algorithms learn and optimize campaigns toward real business value — not just form submissions.
To fully leverage the benefits of the integration, move on to lead tagging best practices in adsfox. There you’ll find clear guidelines, practical scenarios, and proven workflows for qualifying leads, assigning values, and aligning sales and marketing teams around the same data.
Learn more: Lead tagging in adsfox